With the release of Office 2007 Microsoft introduced the Office Ribbon Bar and Quick Access Toolbar to increase user productivity with Microsoft Word, Excel and PowerPoint. In the process these changes have caused a bit of user frustration. While both the Quick Access Toolbar and the Ribbon Bar can boost productivity for users in their default configurations, they can also be easily modified to make them much more user-friendly and effective.
This post will focus on modifying the Microsoft Office 2007 Quick Access Toolbar. With a small amount of fine tuning you can significantly improve the usefulness of the Toolbar, simplify using Office 2007 and potentially increase your productivity with Office 2007. The examples below are from Word 2007, but the steps are similar in Excel and PowerPoint.
Office 2007 Quick Access Toolbar and Ribbon Bar Basics
The default configuration for MS Word 2007 looks like Figure 1 below with the Office Button ![]() located in the upper left hand corner and the Quick Access Toolbar located directly to the right of the Office Button. The Quick Access Toolbar is highlighted here with a red box and arrow. Directly below the Toolbar is the Ribbon Bar.
located in the upper left hand corner and the Quick Access Toolbar located directly to the right of the Office Button. The Quick Access Toolbar is highlighted here with a red box and arrow. Directly below the Toolbar is the Ribbon Bar.
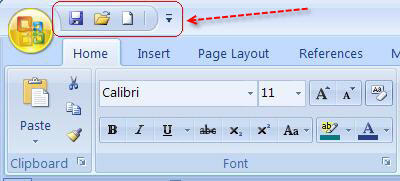
Figure 1. – Default Office 2007 Quick Access Toolbar and Ribbon bar
Modifying the Office Quick Access Toolbar
There are a few default commands included on the Quick Access Toolbar but they are limited to basic functionality like Opening and Saving documents. Adding more commands will make the Toolbar significantly more useful. Additional commands can be easily added by clicking on the small drop down arrow at the right end of the Access Toolbar. Clicking on this arrow will display a menu (see Figure 2.) that allows you to add or remove commands from the Quick Access Toolbar. Click on an item to select or de-select it.
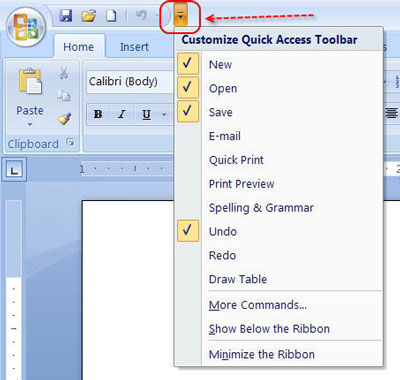
Figure 2 – Office 2007 Quick Access Toolbar Customization Drop Down
Selecting a command on the drop down list will add the command to the Quick Access Toolbar at the top of the screen. Selecting more items from the list will create a Quick Access Toolbar that looks like Figure 3 below.

Figure 3. – Customized & Expanded Quick Access Toolbar
Expanding the Quick Access Toolbar with Additional Commands
There are two other methods for adding additional commands and functionality to the Toolbar. Start by clicking on the Drop Down Arrow at the right end of the Quick Access Toolbar. The “Customize Quick Access Bar” list will appear. Click on the “More Commands…” selection that is highlighted in red in Figure 4.
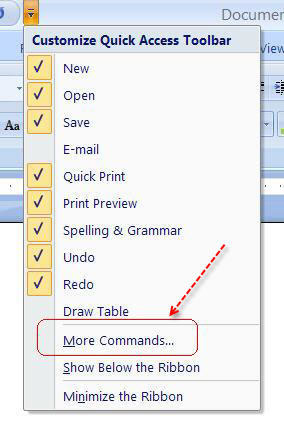
Figure 4. – Adding More Commands to Toolbar
Selecting “More Commands” will then take you to the “Customize the Quick Access Toolbar” screen where you can select (highlight) a command in the left-hand column and then click “Add” to move it to the right-hand column. When you are done adding new commands to the right hand column click “OK” at the bottom of the screen. This will add any new commands you selected to the Quick Access Toolbar.
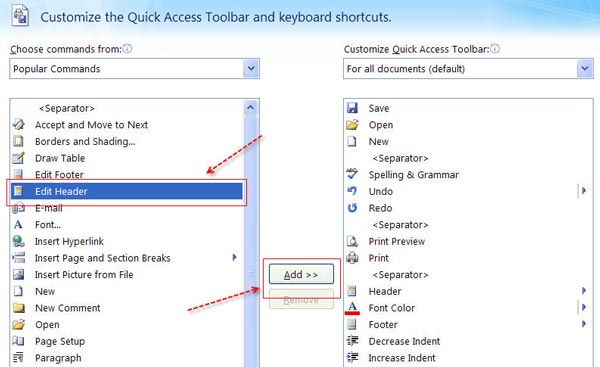
Figure 5. – Customizing the Office 2007 Quick Access Toolbar Screen
Changing the Order of the Commands in the Office 2007 Quick Access Toolbar.
The “Customize the Quick Access Toolbar” screen (Figure 6. – Changing the Order of the Commands) also allows you to change the order that the commands appear on the Quick Access Toolbar. On the right side of the screen – highlighted in red box in Figure 6 – are Up and Down arrows. By highlighting a command and then clicking either the up or down arrow you can change the order of the commands. When done re-ordering the commands click “OK” at the bottom of the screen to save the order.
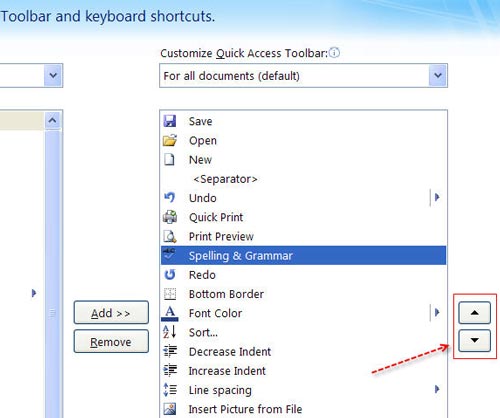
Figure 6. – Changing the Order of the Commands
Adding Commands to Quick Access Toolbar Directly From the Ribbon Bar
Another way to add commands to the Quick Access Toolbar is simply by right-clicking on a command on the Ribbon Bar. In the screen below (Figure 7) the “B” or Bold command has been right-clicked. This then displays the four item menu as shown. Click on the first selection, “Add to Quick Access Toolbar”, that the arrow is pointing at. The command will then appear on the Quick Access Toolbar.
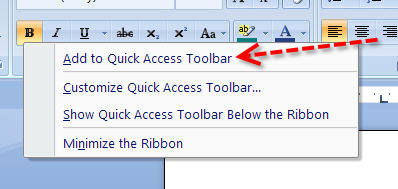
Figure 7. – Right-Click Add A Command Menu
Changing the Display Properties of the Quick Access Toolbar and the Ribbon Bar
The four item menu in Figure 7 also shows three other functions that bear mentioning. The second item on the list “Customize Quick Access Toolbar” brings up the screen shown in Figure 8 which allows you to directly modify the Toolbar and the order of the commands as explained earlier.
The third item on the list, “Show Quick Access Toolbar Below the Ribbon” allows you to change the location where the Toolbar sits relative to the Ribbon Bar. By selecting this option the Toolbar will now be located directly below the Ribbon Bar.
The fourth item on the menu list, “Minimize the Ribbon” hides the Ribbon Bar except for the section titles such as “Home”, “Insert”, and “Page Layout.” The Minimized Ribbon Bar is shown below. Clicking on any of the section titles such as Home will cause the Ribbon Bar to open to its full height.

Figure 8. — Ribbon Bar Minimized Below the Quick Access Toolbar
Give It A Try
With relatively minor modifications to the Quick Access Toolbar and the Ribbon Bar Microsoft Office 2007 including Microsoft Word, Excel and PowerPoint can become significantly more effective tools. The scope and type of modifications will vary with each user’s needs and work habits. Give it a try and see what makes the programs of Office 2007 most effective for you.
