The Microsoft Office 2010 Quick Access Toolbar and Ribbon Bar provide a real productivity boost for Office 2010 users. Originally introduced in Office 2007, Microsoft has continued to expand and enhance the functionality of both the Quick Access Toolbar and the Office Ribbon Bar.
Both elements represented a significant departure from the user interface of pre-2007 versions of Microsoft’s venerable Office suite.
While both are useful in their default configurations users can easily customize them both. Here is how to customize the Quick Access Toolbar and the Ribbon Bar for your individual needs. Gain increased efficiency and productivity with Microsoft Word, Excel, Outlook, PowerPoint, Publisher and Access.
Users of Microsoft Office 2007 should also check out the post on “Increased Productivity with Microsoft Office 2007” as this post is specific to Office 2010.
A key change in Office 2010 is the introduction of the Quick Access Toolbar and Ribbon Bar in Microsoft Outlook. Along with adding productivity and efficiency benefits to Outlook, this transition also provides a consistent look and feel of the Office Ribbon Bar and Quick Access Toolbar across the full Office suite. A number of other changes have made these elements easier to use and more user-friendly.
Quick Access Toolbar and Ribbon Bar Basics
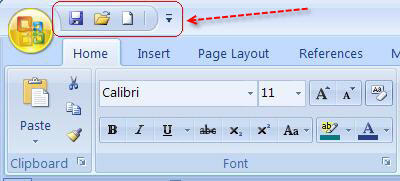
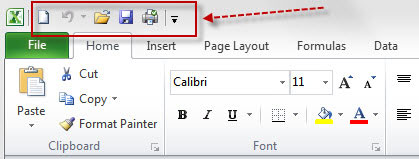
The standard configuration for Microsoft Excel 2010 is shown below in Figure 1. The default Home Tab is selected and the Quick Access Toolbar is located at the top of the screen to the right of the Excel icon. The Quick Access Toolbar icons are highlighted with a red box and arrow. Directly below the Toolbar is the Ribbon Bar with its series of tabs.
Customizing the Quick Access Toolbar Functions
There are a few default commands included on the Quick Access Toolbar however they are rather limited. They include commands like Opening and Saving documents and Undo and Redo. The real power of the Quick Access Toolbar is in adding commands that you regularly use and customizing it to your own needs. The customization process will make the toolbar significantly more useful while requiring less clicks to access the most commonly used commands.
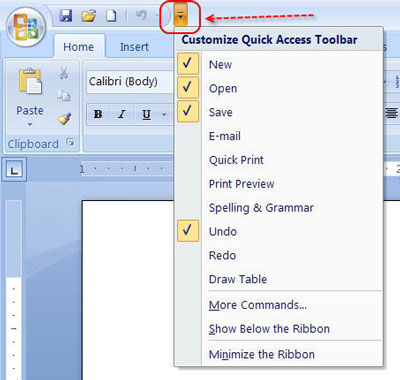
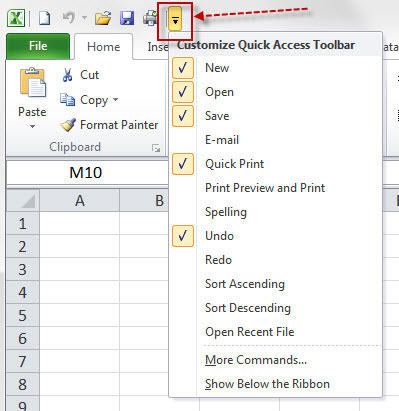
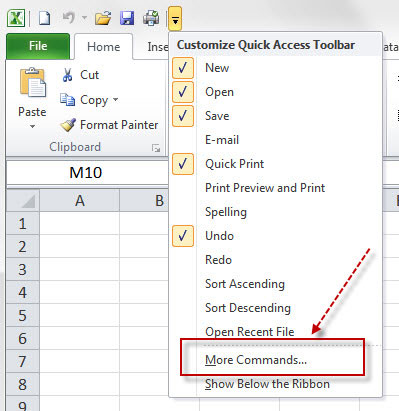
Commands can be easily added to the toolbar by clicking on the small drop down arrow at the right end of the Quick Access Toolbar (see Figure 2). Clicking on this arrow will display a menu (Figure 2) that allows you to select or deselect basic functions from a pre-configured list.
After selecting a command from the list it will be added to the Quick Access Toolbar at the top of the screen. As more items from the list or from the More Commands section discussed below are added the size of the Quick Access Toolbar will grow, potentially looking something like Figure 3 below.

Adding More Commands to the Quick Access Toolbar
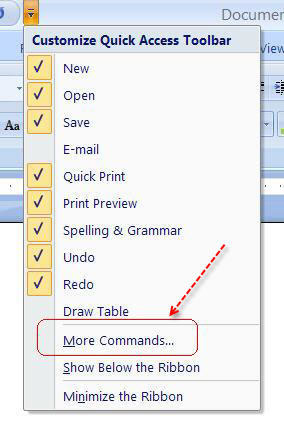
The Customize Quick Access Toolbar dropdown menu allows for a narrow range of additional commands to be added to the toolbar. To access a significantly broader range of commands begin by clicking on the drop down arrow at the right end of the toolbar. The “Customize Quick Access Bar” list will appear. Click on the “More Commands…” selection highlighted in red below.
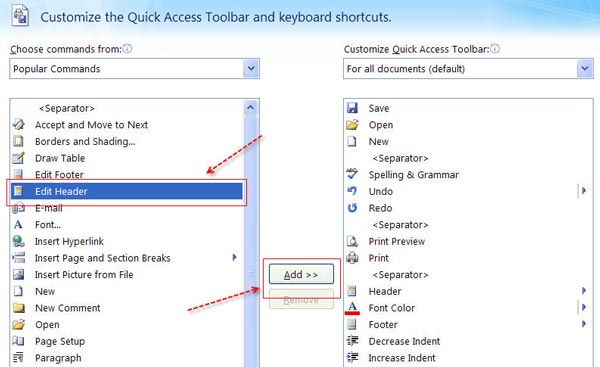
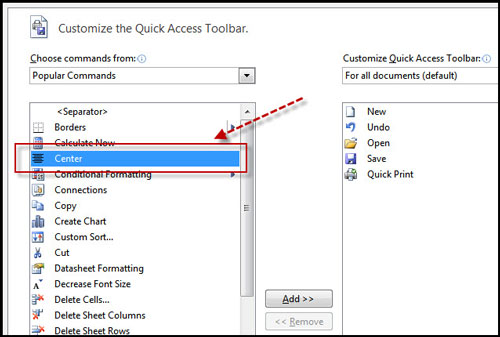
Selecting “More Commands” will display the “Customize Quick Access Toolbar” screen. From here you can select (highlight) any command in the left-hand column to be added to the Quick Access Toolbar. After highlighting a command click the “Add” button in the center to move the command to the right-hand column. When your additions are complete click “OK” at the bottom of the screen. The commands you selected will be added to the Quick Access Toolbar.
Modifying the Quick Access Toolbar Command Order
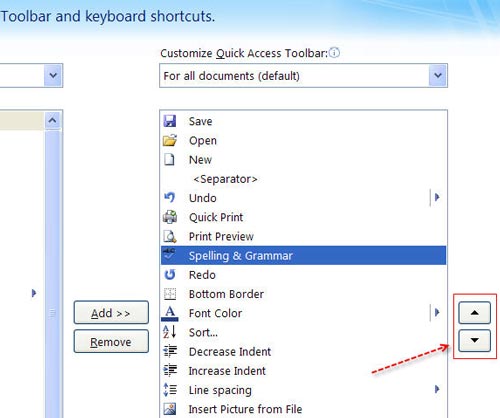
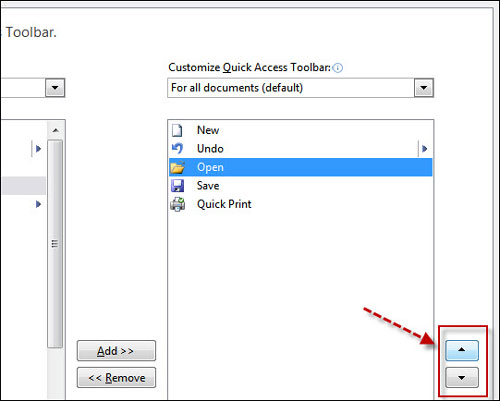
In Office 2010 it is possible to modify the order that the commands on the Quick Access Toolbar appear. The “Customize the Quick Access Toolbar” screen (Figure 6) also allows you to change the order that the commands appear on the Quick Access Toolbar. On the right side of the screen – highlighted in red box here – are Up and Down arrows. By highlighting a command and then clicking either the up or down arrow you can change the order of the commands. When done re-ordering the commands click “OK” at the bottom of the screen to save the order.
Add Quick Access Toolbar Commands From the Ribbon Bar
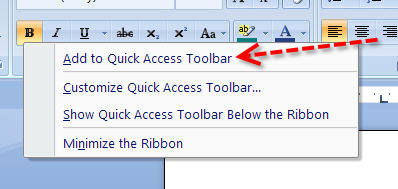
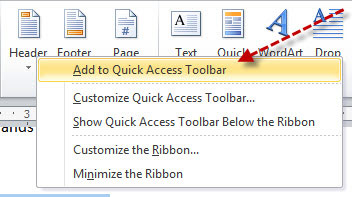
A second method of adding and removing commands on the Quick Access Toolbar is to right-clicking on a command in the toolbar or on the Ribbon Bar. This is illustrated in Figure 7 below where by right clicking on the Header command on the Ribbon Bar a menu appears. Selecting the first item, “Add to Quick Access Toolbar “that the arrow is pointing at will add the command to the toolbar. You can do this for any command in the Ribbon Bar.
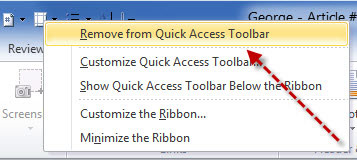
Just as right clicking allows an item to be added to the toolbar, a similar action will allow the removal of a command from the Quick Access Toolbar. Simply right click on the exisitng command in the toolbar that you want to remove. This will display a menu as in Figure 8. Select the option “Remove from Quick Access Toolbar” that the red arrow points to. The command wil immediately be removed from the toolbar.
Modifying Display Properties – Ribbon Bar and Quick Access Toolbar
Office 2010 provides a few different methods to control how the Ribbon Bar and Quick Access Toolbar are displayed or hidden. In the menus shown in both Figure 7 & Figure 8 there are additional options including:
- Customize the Quick Access Toolbar – this will take you to the toolbar customization screen shown in Figure 5.
- Show Quick Access Toolbar Below the Ribbon – selecting this option will reverse the order in which the two elements are displayed with the toolbar now showing below the Ribbon Bar.
- Customize the Ribbon Bar – this will open the Ribbon Bar customization screen which is similar to the toolbar customization screen in Figure 5 & 6.
- Minimize the Ribbon Bar — this will hide (collapse) the bar except for the section titles such as “Home”, “Insert” and “Page Layout”. Figure 9 below shows Microsoft Word with the minimized Ribbon Bar.

Another way to minimize the Ribbon Bar is by clicking on a small arrow head on the far right side of the screen directly below the icons for maximizing, minimizing and closing the application (Word, Excel, Outlook, etc.) as shown in Figure 10. This little arrow head, highlighted by the red arrow in the diagram works as a toggle. Click the arrow head once and the Ribbon Bar will minimize (collapse), click the arrow head a second time and the Ribbon Bar will return to its full size.

Quick Access Toolbar Customization – Try It, You’ll Like It
Although the customization process might seem a bit daunting at first, customizing the Office Quick Access Toolbar and the Ribbon Bar can produce significant benefits for anyone who uses Microsoft Office 2010 or 2007 regularly. With some relatively minor modifications to either element Office 2010 can become a significantly more effective tool. Give it a try and I think you will be glad you did.

